Getting your PDF properly tagged is crucial for accessibility. With PDFix, you can easily tag your PDF document manually to ensure it meets all the necessary standards. Here’s how you can do it.
Once you load your PDF into PDFix, open the tags panel to see the tag tree and keep track of your tagging progress. PDFix provides various tools for selecting objects in your PDF, all accessible from the main panel. We suggest using the Object tool for most of your tagging needs. It automatically selects objects in your document with just a click, making the process much smoother.
How to Tag Headings in a PDF
With the Object tool selected, you’re all set to tag your first item – like a heading. Simply left-click on the heading text to select it, then right-click and choose “Tag As H1.” That’s it – your first tag is done! Use this same approach to tag all your headings.

How to Tag a Paragraph in PDF
Let’s move on to tagging a paragraph. Just like other editors, PDFix gives you a few options for selecting objects in your document.
First, you can simply left-click to select an object, which you might have used for tagging headings earlier. If you need to select more than one object, like an entire paragraph – there are two easy methods. You can either click and drag your mouse over the text you want to select or draw a rectangle around it. Use one of these methods to select the paragraph you need, then right-click and choose “Tag as text.”

How to Tag a List in PDF
PDFix simplifies tagging complex structures like lists and tables with just a single click. Tagging a list is as straightforward as tagging a basic paragraph – just select the list, right-click, and choose “Tag as List.”
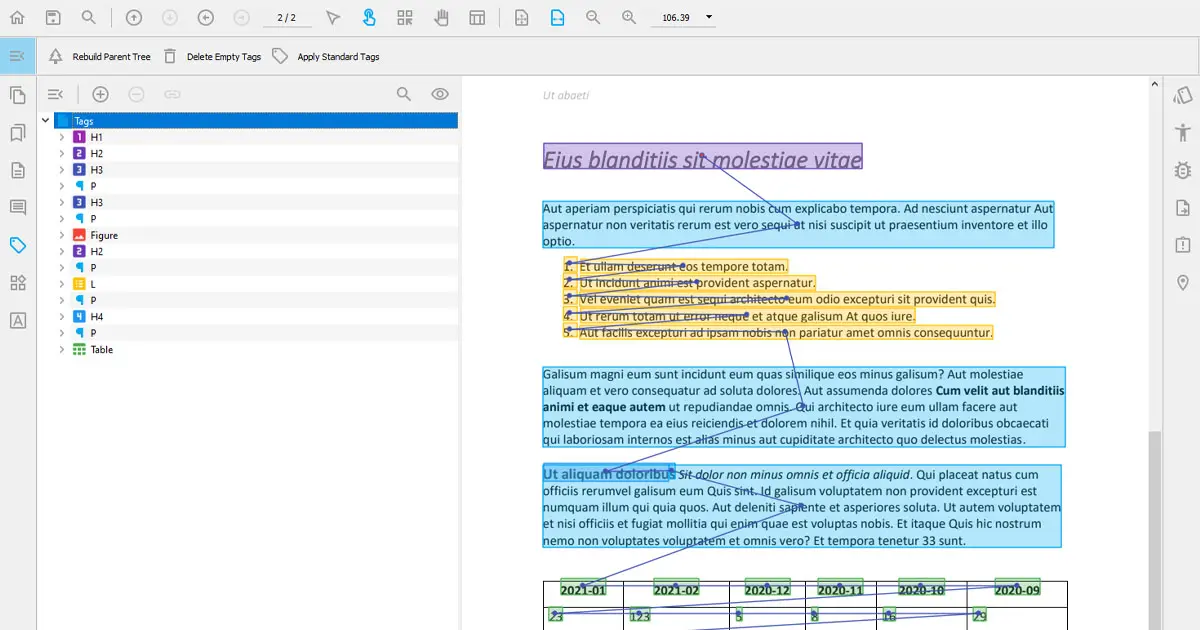
When you tag an object, PDFix handles the details by automatically generating sub-tags based on the structure. For example, when tagging a list, it neatly creates the necessary subtags and separates the numbering from the list text, making your job easier. Check out this feature in the picture below.

Proper PDF Tag Placement for Accessibility
As you tag your PDF, keep an eye on the tag panel to make sure your tag tree is complete and correctly organized. New tags will automatically appear right after the tag you’ve selected, but you can easily drag and drop them into the right spot if needed.
Don’t forget to properly tag your headers and footers. These elements should be marked as artifacts, so they won’t show up in the tags panel.
How to Split an Object into Multiple Tags in PDF
Up until now, we’ve only been using the Object tool. If you need to split an object into multiple tags, you can use the default tool for that. This tool lets you select text by individual letters rather than whole objects, which can be handy if you want to tag a section of a paragraph differently from the rest.

You can use the methods mentioned above to tag any object or structure in your PDF. If you find that tagging tables manually doesn’t give you the results you want, PDFix has a specialized table tool that can help. We’ll dive deeper into this tool in upcoming videos and blog posts.
If your document is too lengthy for manual tagging, you can opt for automatic tagging instead. Check out our Auto-tag video or read our blog, How to auto-tag PDF, to get the details. If the automatic tagging isn’t perfect, don’t worry – our future blog posts will guide you on how to fix any incorrect tags.